工作十几年用过了不少显示器,从最初的 17寸,到后来的 23寸、27寸、32寸、再到现在的 34 寸,根据我自己的使用体验,来个主观推荐:
第一名,一个34寸曲面显示器
第二名,一个27寸 + 一个23寸的双屏组合
第三名,一个32寸 + 一个23寸的双屏组合
第三名,两个 23 寸的双屏组合(并列第三名)
以上这些屏幕推荐购买 2K 及以上的分辨率,1080p 的分辨率不推荐。
下面我就按照时间轴说说我用过的那些显示器。
工作十几年用过了不少显示器,从最初的 17寸,到后来的 23寸、27寸、32寸、再到现在的 34 寸,根据我自己的使用体验,来个主观推荐:
第一名,一个34寸曲面显示器
第二名,一个27寸 + 一个23寸的双屏组合
第三名,一个32寸 + 一个23寸的双屏组合
第三名,两个 23 寸的双屏组合(并列第三名)
以上这些屏幕推荐购买 2K 及以上的分辨率,1080p 的分辨率不推荐。
下面我就按照时间轴说说我用过的那些显示器。
在一个组织内,不同的团队之间可能会有不同的维度来评估 CI/CD 的成熟度。这使得对衡量每个团队的 CI/CD 的表现变得困难。
如何快速评估哪些项目遵循最佳实践?如何更容易地构建高质量的安全软件?组织内需要建立一个由团队成员一起讨论出来的最佳实践来帮助团队建立明确的努力方向。
这里我参考了开源项目 CII 最佳实践徽章计划,这是 Linux 基金会 (LF) 发起的一个开源项目。它提供一系列自由/开源软件 (FLOSS) 项目的最佳实践方法。参照这些最佳实践标准的项目可以进行自认证, 以获得核心基础设施促进会(CII)徽章。要做到这点无需任何费用,你的项目可以使用 Web 应用(BadgeApp) 来证明是如何符合这些实践标准的以及其详细状况。
这些最佳实践标准可以用来:
最佳实践包含以下五个标准:基本,变更控制,报告,质量,安全,分析。

更多关于标准的细分可以参考 CII 中文文档 或 CII 英文文档。
已经很多知名的项目比如 Kubernetes, Node.js 等在使用这个最佳实践徽章计划
![]()
如果你的项目在 GitHub 上或是你可以按照上述的徽章计划进行评估,就可以使用它来评估你项目的最佳实践,并可以在项目主页的 README 上显示徽章结果。
![]()
如果上述项目不能满足你的评估要求,结合我的实践,制定了如下“最佳实践标准”并分配了相应的成熟度徽章,供参考。
| 徽章 | 分数 | 描述 |
|---|---|---|
| 🚩WIP | < 100 | 小于100分获得 🚩Work In Progress 徽章 |
| ✔️PASSING | = 100 | 等于100分获得 ✔️PASSING 徽章 |
| 🥈SILVER | > 100 && <= 150 | 大于100,小于等于150分获得🥈银牌徽章 |
| 🥇GOLD | > 150 | 大于等于150分获得🥇金牌徽章 |
注:这个分数区间可调整。
| 类别 | 最佳实践标准 | 分数 | 描述 |
|---|---|---|---|
| 基本 | 🔰构建任何分支 | 20 | Jenkins:支持任何分支构建 |
| 🔰构建任何PR | 20 | Jenkins:支持对任何 Pull Request 在 Merge 之前进行构建 | |
| 🔰上传制品 | 10 | Jenkins:构建产物上传到制品仓库保存 | |
| 👍容器化构建 | 10 | 推荐使用容器化技术实现Pipeline | |
| 质量 | 🔰自动化测试 | 20 | Jenkins:支持触发冒烟/单元/回归测试 |
| 👍性能测试 | 10 | Jenkins:支持触发性能测试 | |
| 👍代码覆盖率收集 | 10 | Jenkins:支持获得代码覆盖率 | |
| 安全 | 🔰漏洞扫描 | 10 | Jenkins:支持触发漏洞扫描 |
| 🔰License扫描 | 10 | Jenkins:支持触发证书扫描 | |
| 分析 | 👍Code Lint | 10 | Jenkins:支持对PR进行代码格式检查 |
| 👍静态代码分析 | 10 | Jenkins:支持对PR进行静态代码分析 | |
| 👍动态代码分析 | 10 | Jenkins:支持对PR进行动态代码分析 | |
| 报告 | 🔰Email或Slack通知 | 10 | 支持通过Email或Slack等方式通知 |
注:以Jenkins为例。
| No | Repository Name | 实现的最佳实践标准 | 徽章 |
|---|---|---|---|
| 1 | project-a | 🔰构建任何分支 🔰构建任何PR 🔰上传制品 🔰自动化测试 🔰Email或Slack通知 |
🚩WIP |
| 2 | project-b | 🔰构建任何分支 🔰构建任何PR 🔰上传制品 🔰自动化测试 🔰漏洞扫描 🔰License扫描 🔰Email或Slack通知 |
✔️PASSING |
| 3 | project-c | 🔰构建任何分支 🔰构建任何PR 🔰上传制品 👍容器化构建 🔰自动化测试 🔰漏洞扫描 🔰License扫描 🔰Email或Slack通知 |
🥈SILVER |
| 4 | project-d | 🔰构建任何分支 🔰构建任何PR 🔰上传制品 👍容器化构建 🔰自动化测试 👍性能测试 👍代码覆盖率收集 🔰漏洞扫描 🔰License扫描 👍Code Lint 👍静态代码分析 👍动态代码分析 🔰Email或Slack通知 |
🥇GOLD |
Q: 为什么使用徽章而不是分数?
A: 使用徽章能更好的帮助团队朝着目标而不是分数努力。
Q: 建立最佳实践标准还有哪些帮助?
A: 团队之间容易进行技术共享,更容易地构建高质量的安全软件,保持团队之间在统一的高水准。
最近实现了一个很有意思的 Workflow,就是通过 GitHub Actions 自动将每次最新发布的文章自动同步到我的 GitHub 首页。
就像这样在首页显示最近发布的博客文章。
要实现这样的工作流需要了解以下这几点:
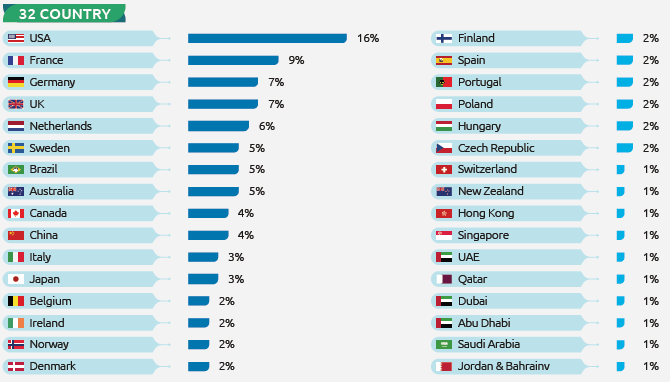
README.md 信息会显示在首页README.md2021-22 世界质量报告(World Quality Report 简称 WQR)是由 Micro Focus,Capgemini 和 Sogeti 三家公司合作的来分析软件质量和测试趋势在全球范围内唯一的报告。
这份报告共采访了 1750 名高管和专业人士。从最高管理层到 QA 测试经理和质量工程师,涵盖了来自全球 32 个国家的 10 个行业。
世界质量报告(WQR)是一项独一无二的全球研究,今年的调查强调了新部署方法中不断变化的受大流行影响的应用程序需求的影响,以及 QA 对敏捷和 DevOps 实践的采用,AI 的持续增长。
作为测试关注这类软件质量报告可以帮助我们快速了解软件测试行业的现状和趋势。
WQR 的一个关键信息:在新冠疫情依旧的今天,我们看到了数字化转型的融合以及敏捷和 DevOps 实践的实时采用。此外,QA 正在成为采用敏捷和 DevOps 实践的领导者,为团队提供工具和流程以促进整个软件生命周期(SDLC)的质量。
WQR 围绕关键发现和趋势突出了五个特定主题:
这可能是中文网里介绍Polaris最详细的文章了
Polaris - 托管静态应用程序软件测试(SAST)工具的 SaaS 平台,它是用于分类和修复漏洞并运行报告的 Web 站点。
SAST - 一种对源代码分析或构建过程中去寻找安全漏洞的工具,是一种在软件开发的生命周期(SDLC)中确保安全的重要步骤。
Coverity - Coverity 是 Synopsys 公司提供的原始静态应用软件测试 (SAST) 工具。Polaris 是 Coverity 的 SaaS 版本。
Synopsys - 是开发 Polaris 和其他软件扫描工具的公司,比如 BlackDuck 也是他们的产品。
C/C++ |
通常如果你的组织引入了 Polaris 的 SaaS 服务,你将会有如下网址可供访问 URL: https://organization.polaris.synopsys.com
然后登录,你就可以给自己的 Git Repository 创建对应的项目了。
建议:创建的项目名称与 Git Repository 的名称一致。
在进行 Polaris 扫描之前,你需要先下载并安装 polaris。
如果你的 Polaris server URL 为:POLARIS_SERVER_URL=https://organization.polaris.synopsys.com
下载连接为:$POLARIS_SERVER_URL/api/tools/polaris_cli-linux64.zip
然后将下载到本地的 polaris_cli-linux64.zip 进行解压,将其 bin 目录添加到 PATH 中。
在进行扫描之前,你需要为你的项目创建 YAML 文件。默认配置文件名为 polaris.yml,位于项目根目录。如果你希望指定不同的配置文件名,你可以在 polaris 命令中使用 -c 选项。
在项目根目录运行 polaris setup 以生成通用的 polaris.yml 文件。
运行 polaris configure 以确认你的文件在语法上是正确的并且 polaris 没有任何问题。
YAML 配置文件可以包含三种类型的 Capture:
| Languages | Build Options |
|---|---|
| C, C++, ObjectiveC, Objective C++,Go, Scala, Swift | 使用 Build 捕获 |
| PHP, Python, Ruby | 使用 Buildless 或 Filesystem 捕获 |
| C#, Visual Basic. | 如果想获得更准确的结果使用 Build 捕获;如果寻求简单使用 Buildless 捕获 |
| Java | 如果想获得更准确的结果使用 Build 捕获;如果寻求简单使用 Buildless 捕获 |
| JavaScript,TypeScript | 使用 Filesystem 捕获;如果寻求简单使用 Buildless 捕获 |
如果你正在扫描 C/C++ 代码,则应包括此分析部分以充分利用 Polaris 的扫描功能:
analyze: |
不管是对于 Git 的初学者还是经常使用 Git 的码农们,在日常工作中难免会有遇到有的命令一时想不起来。不妨将下面总结的一些 Git 常用命令及技巧收藏或打印出来,以备需要的时候可以很快找到。
git config# 检查 git 配置 |
git init# 初始化一个仓库 |
git add# 将文件添加到暂存区 |
git status# 检查仓库状态 |
git commit# 提交更改 |
git log# 查看提交历史 |
git diff# 在使用 diff 提交之前所做的更改 |
git rm# 删除跟踪文件 |
git mv# 重命名文件 |
git checkout# 切换分支 |
git reset# 还原暂存区的更改 |
git commit --amend# 修改最近的提交信息 |
git revert# 回滚最后一次提交 |
git branch# 创建分支 |
git merge# 将 branch_name 合并到当分支 |
git pull# 从远程仓库拉取更改 |
git fetch# 获取远程仓库更改 |
git push# 推送更改到远程仓库 |
git remote# 添加远程仓库 |
清理已经合并的本地分支
git branch --merged master | grep -v "master" | xargs -n 1 git branch -d |
.gitignore指明 Git 应该忽略的故意不跟踪的文件的文件,比如 .gitignore 如下
# 忽略 .vscode 目录 |
.gitattributes关于 .gitattributes 请参考
After you have set up the SonarQube instance, you will need to integrate SonarQube with project.
Because I used the community edition version, it doesn’t support the C/C++ project, so I only demo how to integrate with Maven, Gradle, and Others.
For example, the demo project name and ID in SonarQube are both test-demo, and I build with Jenkins.
Add the following to your pom.xml file:
<properties> |
Add the following code to your Jenkinsfile:
stage('SonarQube Analysis') { |
Add the following to your build.gradle file:
plugins { |
Add the following code to your Jenkinsfile:
stage('SonarQube Analysis') { |
Create a sonar-project.properties file in your repository and paste the following code:
sonar.projectKey=test-demo |
Add the following code to your Jenkinsfile:
stage('SonarQube Analysis') { |
More about how to integrate with SonarQube, please visit your SonarQube instance documentation: http://localhost:9000/documentation
When execute command: lcov --capture --directory . --no-external --output-file coverage.info to generate code coverage report, I encountered the following error:
$ lcov --capture --directory . --no-external --output-file coverage.info |
fixed this problem “Can’t locate CPAN.pm” by running the command yum install perl-CPAN
sh-4.2$ sudo perl -MCPAN -e 'install JSON' |
Then run sudo perl -MCPAN -e 'install JSON' again, it works.
fixed this problem by copying backportPP.pm to the PP.pm file.
$ cd /usr/local/share/perl5/JSON |
bash-4.2$ geninfo --version |
Install perl-Module-Load-Conditional can resolved.
sudo yum install perl-Module-Load-Conditional |
sh-4.2$ lcov --version |
Fixed with following command
perl -MCPAN -e 'install Capture::Tiny' |
Then run lcov --version back to work.
sh-4.2$ lcov --version |
$ genhtml --help |
Need to install the perl module DateTime, On Centos7 run
sudo yum install 'perl(DateTime)'
But this still doesn’t work for me.
geninfo command failedCapturing coverage data from . |
Install package Compress::Raw::Zlib fixed.
perl -MCPAN -e 'install Compress::Raw::Zlib' |
本篇分享如何使用 Gcov 和 LCOV 对 C/C++ 项目进行代码覆盖率的度量。
如果你想了解代码覆盖率工具 Gcov 是如何工作的,或是以后需要做 C/C++ 项目的代码覆盖率,希望本篇对你有所帮助。
不知道你没有遇到过和我一样的问题:几十年前的 C/C++ 项目没有单元测试,只有回归测试,但是想知道回归测试测了哪些代码?还有哪些代码没测到?代码覆盖率是多少?今后哪些地方需要提高自动化测试用例?
可能对于接触过 Java 的 Junit 和 JaCoCo 的人来说,没有单元测试应该测不了代码覆盖率吧 … 其实不然,如果不行就没有下文了 :)
市场上有一些工具可以针对黑盒测试来衡量代码覆盖率 Squish Coco,Bullseye 等,它们的原理就是在编译的时候插入 instrumentation,中文叫插桩,在运行测试的时候用来跟踪和记录运行结果。
其中我比较深入的了解过 Squish Coco 它如何使用,但对于大型项目,引入这类工具都或多或少的需要解决编译上的问题。也正是因为有一些编译问题没有解决,就一直没有购买这款价格不菲的工具 License。
当我再次重新调查代码覆盖率的时候,我很惭愧的发现原来正在使用的 GCC 其实有内置的代码覆盖率的工具的,叫 Gcov
对于想使用 Gcov 的人,为了说明它是如何工作的,我准备了一段示例程序,运行这个程序之前需要先安装 GCC 和 LCOV。
如果没有环境或不想安装,可以直接查看示例仓库的 GitHub 仓库:https://github.com/shenxianpeng/gcov-example
注:主分支 master 下面放的是源码,分支 coverage 下的 out 目录是最终的结果报告。
# 这是我的测试环境上的 GCC 和 lcov 的版本 |
Gcov 工作流程图
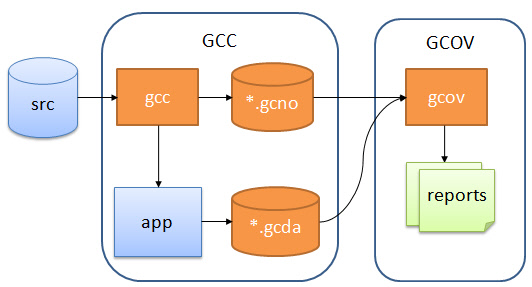
主要分三步:
*.gcno;*.gcda 数据文件;*.gcno 和 *.gcda,通过源码生成 gcov 文件,最后生成代码覆盖率报告。下面就开始介绍其中每一步具体是怎么做的。
第一步编译,这里已经将编译用到的参数和文件都写在了 makefile 里了,只要执行 make 就可以编译了。
make |
sh-4.2$ make |
通过输出可以看到,这个程序在编译的时候添加了两个编译选项 -fprofile-arcs and -ftest-coverage。在编译成功后,不仅生成了 main and .o 文件,同时还生成了两个 .gcno 文件.
.gcno记录文件是在加入 GCC 编译选项-ftest-coverage后生成的,在编译过程中它包含用于重建基本块图和为块分配源行号的信息。
在编译完成后,生成了 main 这个可执行文件,运行(测试)它:
./main |
sh-4.2$ ./main |
当运行 main 后,执行结果被记录在了 .gcda 这个数据文件里,查看当前目录下可以看到一共有生成了两个 .gcda 文件,每个源文件都对应一个 .gcda 文件。
$ ls |
.gcda记录数据文件的生成是因为程序在编译的时候引入了-fprofile-arcs选项。它包含弧过渡计数、值分布计数和一些摘要信息。
make report |
sh-4.2$ make report |
执行 make report 来生成 HTML 报告,这条命令的背后实际上主要执行了以下两个步骤:
在有了编译和运行时候生成的 .gcno 和 .gcda 文件后,执行命令 gcov main.c foo.c 即可生成 .gcov 代码覆盖率文件。
有了代码覆盖率 .gcov 文件,通过 LCOV 生成可视化代码覆盖率报告。
生成 HTML 结果报告的步骤如下:
# 1. 生成 coverage.info 数据文件 |
上传过程中所有生成的文件可通过执行 make clean 命令来彻底删除掉。
sh-4.2$ make clean |
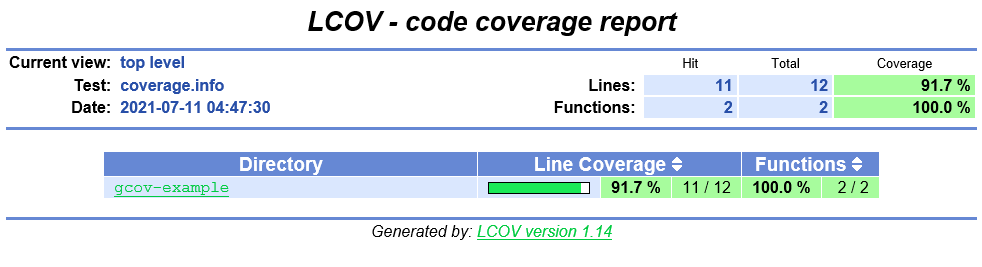
首页以目录结构显示
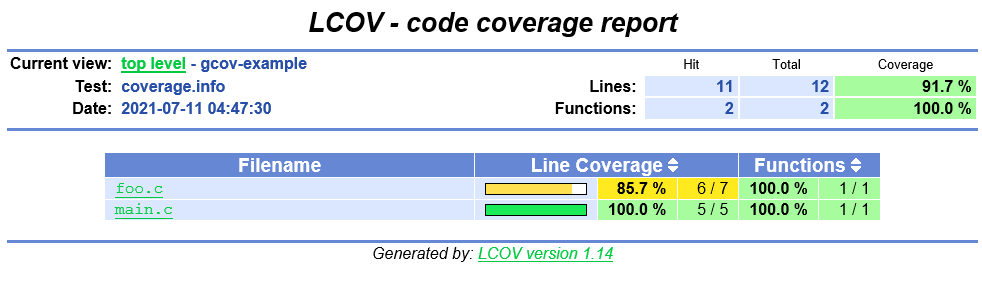
进入目录后,显示该目录下的源文件
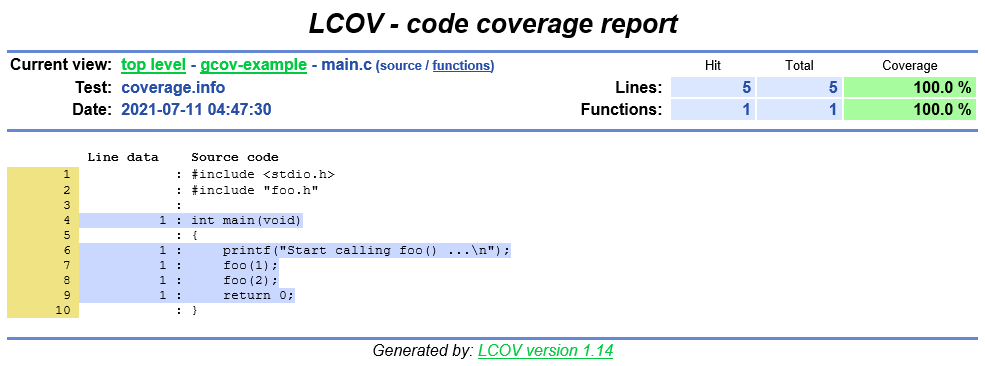
蓝色表示这些语句被覆盖
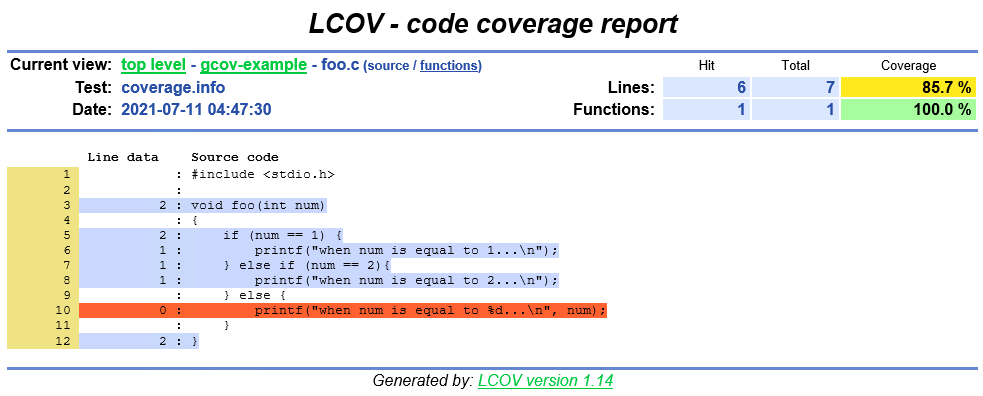
红色表示没有被覆盖的语句
LCOV 支持语句、函数和分支覆盖度量。
旁注:
In my opinion, SonarQube is not a very easy setup DevOps tool to compare with Jenkins, Artifactory. You can’t just run some script under the bin folder to let the server boot up.
You must have an installed database, configuration LDAP in the config file, etc.
So I’d like to document some important steps for myself, like setup LDAP or PostgreSQL when I install SonarQube of v9.0.1. It would be better if it can help others.
Need to be installed JRE/JDK 11 on the running machine.
Here is the prerequisites overview: https://docs.sonarqube.org/latest/requirements/requirements/
Download SonarQube: https://www.sonarqube.org/downloads/
cd sonarqube/ |
I installed SonarQube on CentOS 7 machine, the Java version is OpenJDK 1.8.0_242 by default, but the prerequisite shows at least need JDK 11. There is also JDK 11 available on my machine, so I just need to change the Java version.
I recommend using the alternatives command change Java version,refer as following:
$ java -version |
SonarQube needs you to have installed a database. It supports several database engines, like Microsoft SQL Server, Oracle, and PostgreSQL. Since PostgreSQL is open source, light, and easy to install, so I choose PostgreSQL as its database.
How to download and install PostgreSQL please see this page: https://www.postgresql.org/download/linux/redhat/
Please refer to the sonar.properties file at the end of this post.
sonar.security.realm=LDAP |
Comment out ldap.followReferrals=false in sonar.properties file would be help.
Related post: https://community.sonarsource.com/t/ldap-login-takes-2-minutes-the-first-time/1573/7
I want to display Javascript code coverage result in SonarQube, so I added sonar.javascript.lcov.reportPaths=coverage/lcov.info to the sonar-project.properties
But when I run sonar-scanner.bat in the command line, the code coverage result can not show in sonar. I noticed the following error from the output:
INFO: Analysing [C:\workspace\xvm-ide\client\coverage\lcov.info] |
There are some posts related to this problem, for example, https://github.com/kulshekhar/ts-jest/issues/542, but no one works in my case.
# here is an example error path in lcov.info |
Finally, I have to use the sed command to remove ..\ in front of the paths before running sonar-scanner.bat, then the problem was solved.
sed -i 's/\..\\//g' lcov.info |
Please comment if you can solve the problem with changing options in the tsconfig.json file.
To output more logs, change sonar.log.level=INFO to sonar.log.level=DEBUG in below.
Note: all above changes of
sonar.propertiesneed to restart the SonarQube instance to take effect.
sonar.propertiesFor the sonar.properties file, please see below or link