Nightwatch 测试用例失败继续执行

自动化测试中,有一个验证点,当测试通过时,后面的测试脚本继续执行;
当出现异常时,你希望标记出来这个错误,但不影响后面的测试脚本执行,在 Nightwatch 中如何做?

下面的一段代码验证 home 页面的 body 是否显示。这里如果显示则将验证点置为 false,如下:

home.waitForElementVisible('@body', 3000, true, function(result) {
if (result.value) {
// 测试报告中会显示失败,但是会继续执行后面的测试脚本
client.verify.equal(result.value, false);
} else {
// 验证点通过
console.log('Pass');
}
});

注意:这里如果用 assert,程序就会中断执行。

// 中断执行
client.assert.equal(result.value, false);

Nightwatch 验证元素是否存在

元素常用验证方法

验证元素的值信息

andesFormSection
.assert.containsText('@errorMessage', 'The email address is invalid.')

验证元素是否可用

andesFormSection
.assert.attributeEquals('@continueBtn', 'disabled', 'true');

等待元素可用

andesFormSection
.expect.element('@signInBtn').to.be.visible.before(5000);
# 或者
andesFormSection
waitForElementVisible('signInBtn', 5000);

等待元素呈现

andesFormSection
.expect.element('@signInBtn').to.be.present.before(5000);
# 或者
andesFormSection
waitForElementPresent('signInBtn', 5000);

判断元素是否存在

用 Nightwatch 去判断一个 element 是否存在,如果存在执行如下操作,如果不存在做另外的操作。
这个在 Java 编写的自动化测试用例中可以用 try catch 可以解决,Nightwatch 试过不行。
另外看到 stackoverflow 上有通过判断 (result.status != -1),没有解决我的问题。

最后这样解决的,请看下面 tutorial.js

const tutorialCommands = {
notShowTutorial: function() {
const tutorialSection = this.section.tutorial;
this.api.element('css selector', '.andes-dialog md-icon', function(result) {
if (result.value && result.value.ELEMENT) {
this.pause(2000);
tutorialSection.click('@doNotShowBtn');
this.pause(2000);
tutorialSection.click('@closeBtn');
} else {
console.log('no tutorial exists');
}
});
}
};

module.exports = {
commands: [tutorialCommands],
url: function() {
return `https://shenxianpeng.github.io/`;
},
sections: {
tutorial: {
selector: '.andes-dialog',
elements: {
closeBtn: 'md-icon',
doNotShowBtn: 'md-checkbox .md-container'
}
}
}
};

注意:这里的元素不能通过 section 的方式引用,例如这样,怀疑这是 Nightwatch 的 bug。

tutorialSection.api.element('css selector', '@closeBtn', function(result) {

}

Hexo 配置 rss 订阅功能

安装 hexo-generator-feed 插件

npm install hexo-generator-feed --save

如果国内 npm 安装不成功,可以先安装 cnpm

npm install -g cnpm --registry=https://registry.npm.taobao.org

然后再

cnpm install hexo-generator-feed --save

在 _config.yml 中配置这个插件

feed:
type: atom
path: atom.xml
limit: 20
hub:
content:
content_limit: 140
content_limit_delim: ' '

Hexo 博客文章中插入图片

如果想在 Hexo 文章中插入图片怎么做?

网络上很容易搜到 Markdown 的语法是 ![Alt text](/path/to/img.jpg)
前面 Alt text 是指在图片下面命名,后面是图片的地址。那么如何配置?

经过几番尝试得知:在你的 hexo 项目根目录下面 source 创建一个 images 文件夹,
把你以后用的到图片都放在这个目录下面就 OK 了。

![示例图1](../images/color.png)

Nightwatch 自动化测试中比较颜色

在做 Nightwatch 自动化测试中,出现需要比较颜色的时候如何来做?
基本的思路是首先需要取到这个 element 的颜色值,然后跟预期的颜色进行对比。
比如我要取下面这个会话窗口的颜色,选中这个图标,按 F12,查看这个图标的属性。发现Angular中的颜色属性不是 Elements 下,是在 Styles 下面,如何取到这个颜色值?

element

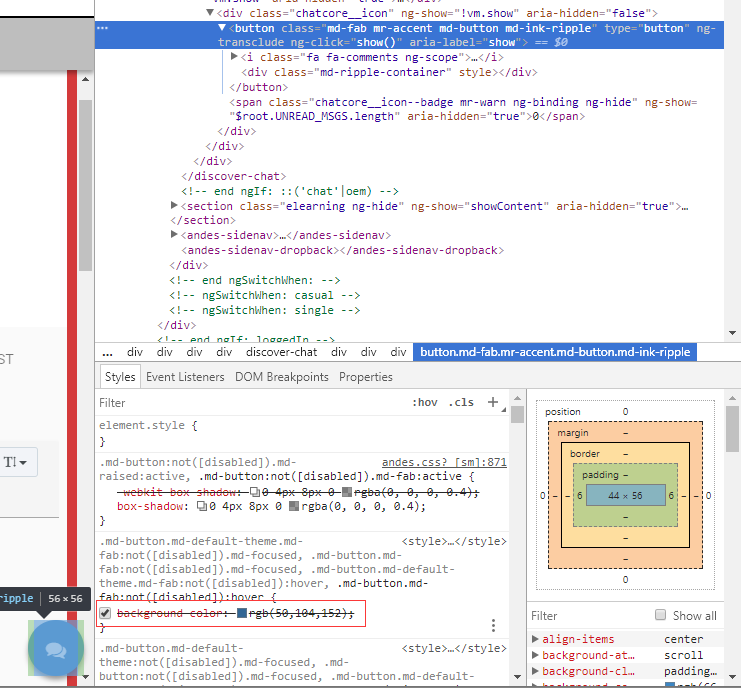
这里会用到 getCssProperty 这个方法,具体如何使用,请看如下代码:

getChatColor: function(cb) {
const chat = '[ng-click="show()"]'
this.getCssProperty('@chat', 'background-color', function(result) {
cb(result.value);
});
return this;
},

将上面的 getChatColor command 代码放到一个叫 chat.js 的 page 下面,然后在测试用例中这样调用这个 command

'Test get color': function (client) {
var chat = client.page.chat();
let chatColor;
chat.navigate();

chat.getChatColor(function(color) {
chatColor = color;
});
client.perform(function() {
client.assert.equal(chatColor, 'rgba(50, 104, 152, 1)');
});
}

截图中看到的 background color 是 rgb(50, 104, 152), 但是 getChatColor 返回指是rgba,rgb 和 rgba 之间需要转化一下,a 表示透明度,取值0~1之间。

Nightwatch 获取接口返回数据

如何在 JavaScript 通过接口自动生成和返回接口数据呢?

在自动化测试中常常遇到接口测试,或是使用的数据需要从接口返回,那么如何来实现这种情况?
例如我想通过 generateLicense 方法生成一个 license,然后在之后的自动化测试用例中使用这个生成的 license 继续做下一步的操作,例如注册 license 等。

在 license.js 文件中创建一个 generateLicense 方法:

generateLicense: function(success, day, capacity, code) {
var request = require('request');
var options = { method: 'POST',
url: 'https://generate-license/api/licenses',
headers:
{ 'postman-token': 'd849e636-58c9-2705',
'cache-control': 'no-cache',
authorization: 'Basic YWRtaW46U',
'content-type': 'application/json' },

body: { company: 'Google',
email: '5012962@qq.com',
expiration: day,
capacity: capacity,
phone: '89262518',
address: 'Dalian',
code: code },
json: true
};

request(options, function (error, response) {
if (error) {
console.log(error);
return;
}
success(response);
});
},

对上面生成的 license 进行赋值,之后的测试用例中就可以使用 MVlicense 了。
使用中会涉及到异步操作,异步如何操作请看之前的文章。

const license = client.page.license();
let MVlicense;
license.generateLicense(function(response) {
MVlicense = response.body.data.license.license;
}, 365, 10, 'MV');

Nightwatch 异步操作

在自动化测试中常常需要通过一个 command(或 function )中返回的值来进行下一步的操作,JavaScript 与 JAVA 在调用返回值时有所不同,JS 中需要特定的写法来进行这种异步操作。

以下面的 get License 数量为例,首先需要 get 一次 License 数量,然后进行一些列操作之后,再一次 get License 数量,比较这两次 License 数量值。

getLicenseNum 方法:

getLicenseNum: function (cb) {
const license = 'ul > li.license-id.ng-binding';
this.waitForElementVisible(license, 5000);
this.api.elements('css selector', license, function (result) {
cb(result.value.length);
return this;
});
}

对两次得到的 License num 进行比较:

'JavaScrpit asynchronous operation': function(client) {
const license = client.page.license();
let num1, num2;
license.getLicenseNum(function(num) {
num1 = num;
});
license.getLicenseNum(function(num) {
num2 = num;
});
client.perform(function() {
client.assert.equal(num2 - num1, 1, 'license number increase 1');
});
}

Nightwatch 模拟键盘操作

在自动化测试中有这样一个场景,在一个输入框中输入一串字符,然后执行敲回车键,验证搜索结果,以 Google 搜索为例,代码如下:

'search nightwatch and click ENTER key': function(client) {
client
.url('http://google.com')
.expect.element('body').to.be.present.before(1000);
client.setValue('input[type=text]', ['nightwatch', client.Keys.ENTER])
.pause(1000)
.assert.containsText('#main', 'Night Watch');
}

Read More

Nightwatchjs 中文参考手册

Nightwatch中文参考手册

为何放弃 JAVA 改用 Nightwatch

  • 项目初期用的是 Java + Selenium + TestNG 自动化框架,由于之前推行的力度不够,加上繁重的功能测试和频繁的项目变更导致自动化测试代码跟不上开发的进度,大量的测试代码无法正在运行。
  • 我们的产品采用的 AngularJS 开发,前端开发人员对js对Java更精通,以后的自动化脚本开发也可以一起编写。
  • Nightwatch 的环境配置和执行简单,只要 npm install、npm test 就可以运行起来,方便配置,运行和继续集成。

因此,与其维护不可用的代码不如好好整理,不如在项目领导和开发的强力支持下重新开始做一套可用的 E2E 测试。

关于 Nightwatch 翻译

学习中发现 Nightwatch 没有比较完整的中文参考手册,因此决定学习之余翻译下官方文档,如有问题,欢迎纠正。

JST automation framework

This automation framework was design by Java+Selenium+TestNG when I did automation test work, so I called it JST-automation.

Directory Structure

├──JST-automation
| ├── src
| | └── main
| | | └── java
| | | | └── com
| | | | | └── action
| | | | | | └── case01
| | | | | | └── case02
| | | | | | └── common
| | | | | | └── .....
| | | | | └── config
| | | | | | └── UserConfig
| | | | | | └── DriverConfig
| | | | | | └── UrlConfig
| | | | | | └── ......
| | | | | └── page
| | | | | | └── LoginPage
| | | | | | └── HomePage
| | | | | | └── ......
| | | | | └── verify
| | | | | | └── case01
| | | | | | └── case02
| | | | | | └── ......
| └── testng.xml
| └── pom.xml
  1. action: all test function write in this folder
  2. config: all config file put in this folder
  3. page: all page element write in this folder
  4. verify: all verify test case write in this folder
  5. testng.xml: test suit file, config all verify test case in this file
  6. pom.xml: configuration need package files

Download Code

git clone https://github.com/shenxianpeng/JST-automation.git

Any suggestion and questions please feel free to create issue here